Meal Application Household Members Tab
Students > Meal Applications > Household Members

Extend Benefits (not pictured, DC apps only) - click to select additional student household members to which to extend benefits from the DC-identified student(s)
-
Eligibility Benefit Number - enter an eligibility benefit number (aka Case Number, EDG Number, etc.) if applicable
-
Name - click to sort by (Identifier) and Name
-
Total Wages - click to sort by total wages (non-student household members only)
-
Eligibility Status - click to sort by eligibility status
-
Start Date - click to sort by eligibility start date
-
End Date - click to sort by eligibility end date
-
Link Plus Icon - click to unlink the student from the meal application. The line item will remain but the application will not be attached to the student.
-
Paper Icon - if there is a different current meal application on file for the same student, hover to see the meal application information; click to be redirected to that meal application
Person Icon (not pictured) - this icon indicates the student(s) on the application that were listed on the official direct certification documentation and that can extend benefits -
Mortarboard - hover to see the students current enrollment information; click to be redirected to the student's general tab
-
Pencil - click to edit details
Non-Student - see Step 14 for details
Student:
-
First Name - enter the first name
-
Last Name - enter the last name
-
Student - toggle student status (Checked = Student, Unchecked = Non-Student)
-
Eligibility Benefit Type - select an eligibility benefit type if applicable
Directly Certified (not pictured, Direct Certification application source only) - check to indicate that this student is on the official direct certification list (not extended benefits) -
Delete - click to remove this student line item from the application
-
Cancel - click to return to the previous screen without saving changes
-
Save - click to save changes
-
Link Icon - click to select a student from the database as the matching student for the line item
-
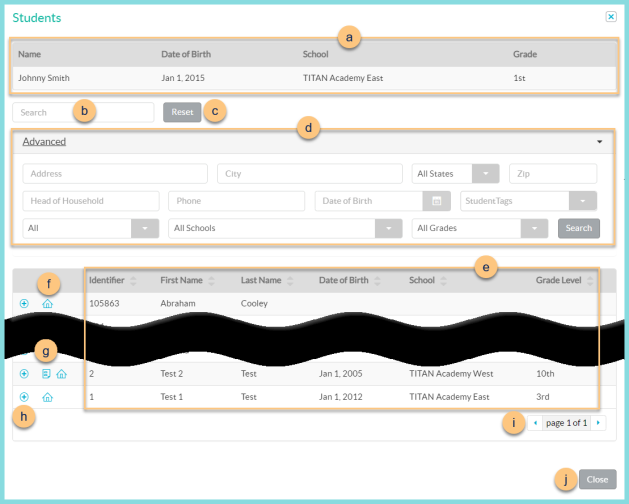
Notice the Name, Date of Birth, School, Grade, and Benefit Type as entered on the online application.
-
Search - search for existing students by name or identifier
-
Reset - click to reset search parameters
-
Click Advanced to open additional filters including Address, Head of Household, Phone, Date of Birth, Student Tags, All (enrollment status), Schools, and Grades. Click Search to apply advanced filters.
-
Notice the Identifier, First Name, Last Name, Date of Birth, School, and Grade Level of students in the database. Click the header to sort by that field.
-
House Icon, Truck Icon (not pictured) - hover to see the home address or mailing address respectively
-
Paper Icon - hover to see current meal application information. An orange icon indicates that the application is expiring soon. Note: This icon is only visible if the student has another application on file
-
(+) - click to select the student as a match
-
< > - click to scroll through pages
-
Close - click to return to the previous screen without selecting a student
-
< > - click to scroll through pages
-
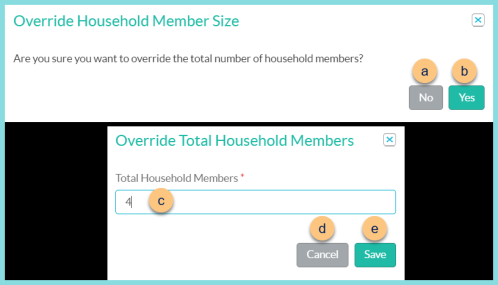
Override Total Household Members - click to enter a household size that will override the count of household member line items (not recommended).
-
No - click to return to the previous screen
-
Yes - click to proceed to override total household members
-
Total Household Members - notice the TITAN-calculated value (count of household member line items), and type a different number to override
-
Cancel - click to return to the previous screen without saving changes
-
Save - click to override total household members
-
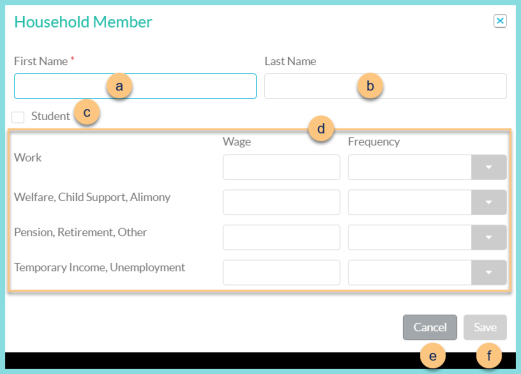
(+) New Household Member - click to add a non-student to the application. Note: Household Member refers to any member of the household that is not enrolled in the current district. All members of the household should be entered for accurate calculation of the household size.
-
First Name - enter the household member's first name
-
Last Name - enter the household member's last name
-
Student - check to mark the household member as a student of the current district, then refer to Step 10 for further details.
-
Enter the Wage (dollar amount) and select the Frequency (Monthly, Weekly, Twice a Month, Every Other Week, Annualy) for each wage type (Work; Welfare, Child Support, Alimony; Pension, Retirement, Other; Temporary Income, Unemployment). Leave the wage blank if $0.
-
Cancel - click to return to the previous screen without saving changes
-
Save - click to add new household member
-
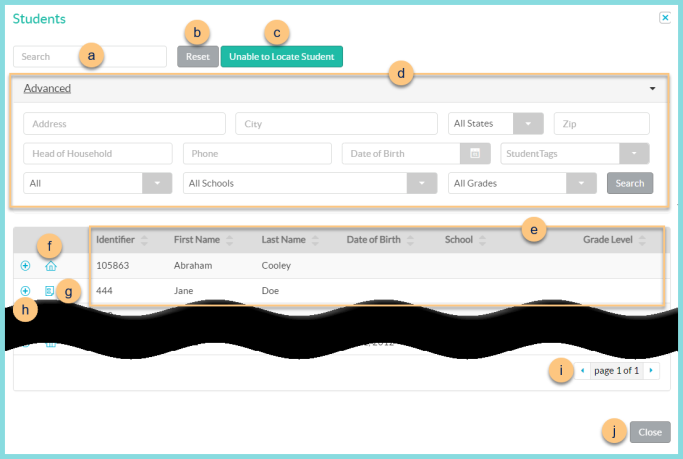
(+) New Student - click to add a student to the application. Note: If this button is clicked before Step 13, any recognized household members from the Student's Household tab will be automatically populated rather than having to enter manually with Step 13. Note: Student refers to any household member enrolled in the current district.
-
Search - search for existing students by name or identifier
-
Reset - click to reset search parameters
-
Unable to Locate Student - click to designate that the student cannot be found in the database and enter the student information manually. Refer to Step 10 for details.
-
Click Advanced to open additional filters including Address, Head of Household, Phone, Date of Birth, Student Tags, All (enrollment status), Schools, and Grades. Click Search to apply advanced filters.
-
Notice the Identifier, First Name, Last Name, Date of Birth, School, and Grade Level of students in the database. Click the header to sort by that field.
-
House Icon, Truck Icon (not pictured) - hover to see the home address or mailing address respectively
-
Paper Icon - hover to see current meal application information. An orange icon indicates that the application is expiring soon. Note: This icon is only visible if the student has another application on file
-
(+) - click to select the student as a match
-
< > - click to scroll through pages
-
Close - click to return to the previous screen without selecting a student
-
Child Income - enter the sum of all income for students listed on the application if applicable
-
Child Income Frequency - select the frequency of the entered Child Income if any
-
Back (incomplete applications only) - click to return to the General tab
Close (not pictured, processed applications only ) - click to return to the Meal Applications screen -
Next (unprocessed applications only) - click to move to the Certification tab
Save (processed applications only) - click to save changes if any